


When it comes to making your home more energy-efficient, internal wall insulation is often ignored in favour of more familiar options like loft or external insulation. However, adding insulation to internal walls can bring significant benefits, such as better temperature control and reduced noise between rooms. It is a smart and surprisingly accessible solution for the people who are looking to lower their heating costs and create a more comfortable living space.
Insulating your interior walls can help keep warmth locked in during winters and maintain cooler conditions in summer. This step-by-step guide is designed for the beginners who want to understand the insulation process clearly without complicated terms or confusion. If you are ready to take on a worthwhile home improvement project, this is the best place for you to get started.
Why Insulate Internal Walls?
Internal wall insulation is the best option for rooms that suffer from cold spots, draughts, or excessive noise. Internal insulation doesn’t need scaffolding or any major work outside.
Insulating internal walls helps you to:
- Maintain a stable indoor temperature
- Reduce noise between rooms
- Save on energy bills, particularly in older homes
Also Read: 10 Essential Home Insulation Tips to Reduce Energy Bills
Types of Internal Wall Insulation
Before getting started, it’s helpful to understand the two primary methods for insulating internal walls, which are:
- Stud Wall Insulation
This method involves constructing a new timber or metal stud frame against your existing walls. Insulation material such as mineral wool or rigid foam boards is placed between these studs, and the whole structure is covered with plasterboard before finishing.
2. Insulated Plasterboard (Direct-Fix Method)
Pre-insulated plasterboards are fixed directly to your existing wall using adhesive or mechanical fixings in this method of insulation. It installs quickly and takes up less room space, though it’s slightly less effective in extreme temperatures than stud walls.
Step-by-Step Guide to Insulating Internal Walls
Step 1: Assess the Wall and Room
You can start by evaluating the condition of your wall. Look out for signs of damp, peeling paint, or any structural issues. It is very important to deal with moisture or ventilation issues before applying insulation to avoid the chances of trapping dampness inside the walls.
Step 2: Choose Your Insulation Method
You should first decide whether you want insulated plasterboard or building a stud wall. If your room space is tight or you want a quicker installation, plasterboard may be the better choice. For superior thermal performance, especially in very cold rooms, a stud wall with thicker insulation is ideal.
Step 3: Measure and Mark Up
Measure the wall to get its dimensions. If you’re adding a stud frame, mark where the vertical studs will be placed. Be sure to allow space for any outlets or switches, and plan ahead if any wiring needs to be moved or adjusted.
Step 4: Install a Vapour Barrier (if required)
A vapour control layer helps you prevent condensation forming behind the insulation, particularly in humid rooms.
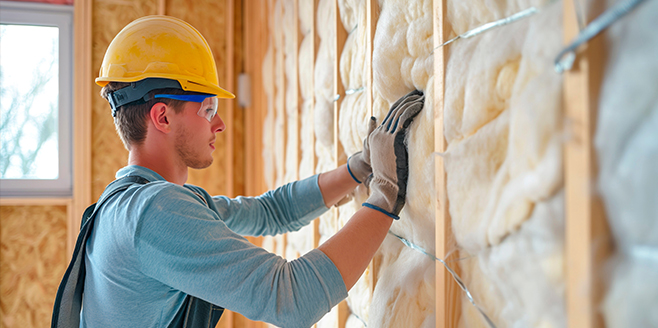
Step 5: Fit the Insulation
Cut insulation batts or boards to fit snugly between the frame uprights of stud walls. Make sure there are no gaps, as this reduces effectiveness. For insulation boards, apply adhesive dots (known as ‘dot and dab’) or use fixings to attach the boards directly to the wall.
Step 6: Board and Finish
Fix the board over the wall and secure it with screws. Seal the joints using jointing tape, then apply filler to cover screw holes and any gaps. Once everything is dry, you can skim, paint, or wallpaper the surface just like a standard wall.
Step 7: Replace Fixtures and Decor
After the insulation and boarding are finished, put back any fixtures, electrical outlets, or skirting boards that were removed. Your wall is now insulated, and the room should feel warmer and more soundproof.
Also Read: What Is External Insulation Render? Benefits & Installation Guide
Common Mistakes to Avoid
- Skipping moisture checks: Trapping damp behind insulation can lead to mould and structural issues.
- Gaps in insulation: Small openings can reduce efficiency and cause unnecessary heat loss.
- Using incorrect fixings: Always use the appropriate screws and anchors for your wall type and insulation material.
Take your time to plan and measure accurately. A careful approach ensures you get the maximum benefit from your investment.
Infinity: Helping You Build an Energy-Efficient Home
At Infinity, our services include expert guidance on insulation methods that enhance indoor comfort and help reduce heating costs for making your home warmer, quieter, and more cost-effective.
From recommending the right insulation materials as one of the most trusted TrustMark-certified installers, we offer tailored advice for homeowners and businesses who are looking to reduce energy loss and increase sustainability. Whether you are retrofitting an older home or upgrading a modern build, Infinity provides the insights and support you need to get it right the first time.
Conclusion
Internal wall insulation is an excellent way to boost your home’s energy performance, reduce heating bills, and improve comfort, all without major structural work. It is a practical DIY project for some and a smart professional upgrade for others. Whether you’re tackling a single cold room or planning a full-home retrofit, insulating your internal walls pays off quickly.
Infinity is here to support you with professional advice, high-quality products, and a passion for sustainable living. Get in touch today for help with your insulation project and take a big step towards a warmer and more energy-efficient home.